
01dragonslayer
Iron Killer
Mad Referrer
Jacked Immortal
EG Auction Sniper
VIP Member
Shout Master
Mutated
Fully Loaded
- EG Cash
- 1,113,693
FROM WHEELCHAIR TO CROSSFIT
Posture is the key to achieving maximum results in hypertrophy, leanness, and aesthetics. After suffering from severe hip pain that left me in a wheelchair at the age of 27 for nearly a year, I healed myself using a simple exercise therapy technique (Posture Alignment Therapy).Today I'm pain and wheelchair free. I participate in CrossFit and recreational weightlifting with no pain or physical limitation. My real life experience with fixing my own body, along with helping hundreds of others, has given me insight into how the human body really works.
The goal? Maintain longevity in your sport with minimal pain and injuries while achieving a perfectly symmetrical physique. All you need are some self-assessments and simple exercises.
How to Assess Your Posture
This image below reminds us that the human body has 8 major load-bearing joints. These load-bearing joints are designed to stack vertically and to align horizontally. From the side view, you should be able to pass a plumb line from the earlobe straight down through the ankle.
This may seem basic or even irrelevant to you and your lifting program, but when it comes to staying pain and injury free and developing aesthetically-pleasing muscular symmetry, joint alignment is critical.
Three Quick Self-Assessment Tests
Let's go over a few self-assessment tests so that you can get a sense of how your body is currently aligned.- First, stand in front of a mirror and have a look at your shoulders. Anything other than square, symmetrical shoulders indicates an imbalance.
- Is one shoulder higher than the other?
- Is one shoulder rotated more inward than the other? Look at your hands in the mirror. Do you see the backs of your hands, or do you see your thumb and forefinger? If you see the backs of your hands, it means your shoulders are internally rotated.
- Next, kick off your shoes and close your eyes. Pay attention to the weight distribution in your feet. Take about 10-15 seconds to really tune into what you're feeling.
- Do you feel more weight on one foot than the other?
- Do you feel more weight on the balls of your feet or the heels of your feet?
- Do you feel weight on the inner edges of your feet or the outer edges of your feet?
- Take a mental snap shot of what you're noticing and we'll re-test after doing some exercises.
- Now open your eyes and look down at your feet.
- Do both feet point straight ahead, or does one foot turn out more than the other? Basic human design says that both feet should point symmetrically straight ahead. Feet that turn out are an indicator of lower leg muscles and hips that aren't doing their job.
Postural Alignment Exercises
Now let's go over some strategies for achieving balance and symmetry in the shoulders, hips, and lower legs. Give these four exercises a try and then we'll reassess.SITTING ARM CIRCLES
- Find a chair and position it in front of a mirror so that you can watch your shoulder positioning during this exercise. Start by sitting in the middle of the chair with your feet pointed straight ahead, 4-6 inches apart.
- Roll your pelvis forward to create a small arch in your low back. Relax your stomach and hold this position throughout the exercise.
- Squeeze your shoulder blades together and extend your arms straight out from your sides up to shoulder level.
- Curl your fingertips to your palms, point your thumbs out straight ahead. During the exercise, be sure to keep your arms straight and at shoulder level.
- With palms facing down and thumbs pointing straight forward, rotate your hands up and forward in approximately 6-inch circles for 40 reps.
- Now reverse direction. Palms should now face up, with thumbs pointed straight backward. Rotate your hands up and backward for 40 reps.
- Watch the position of your shoulders for the duration of the exercise to make sure they stay level. If one shoulder is higher than the other, you'll negate the benefits of the exercise.
What this does for your appearance: Creates the foundation upon which to build symmetrical shoulder and back muscles.
SITTING ELBOW CURLS
- Stay in the seated position in front of your mirror with your feet pointed straight ahead, 4-6 inches apart.
- Roll your pelvis forward to place a small arch in your low back. Relax your stomach and hold this position.
- Curl your fingertips to your palms and point your thumbs out. Place your big knuckle at your temple with your thumbs pointed down towards the ground. Don't lose your hip position. Keep them rolled forward and maintain the arch in your low back.
- Pull your elbows back and then close them together in front of your face. Keep your elbows up at shoulder level. Don't let them drop down. Don't let your head move from front to back. Your head should stay in one place for the duration of the exercise.
- Repeat for 25 reps. Be sure to bring your elbows all the way back, as if you were sitting up against a wall and moving your elbows to touch the wall. When you bring your elbows together to touch in front of your face, try to keep them as high as they'll go.
What this does for your appearance: Creates the broad-shoulder look versus the hunched-over look.
KNEELING ANKLE SQUEEZES
- Kneel down with a pillow or block between your ankles/feet. If needed, place your hands on a chair or bench for balance.
- Squeeze then release the pillow or block between the entirety of the inner edge of your ankles/feet. You should be pressing evenly through the balls of your feet and the heels of your feet. Keep your stomach muscles relaxed throughout the exercise.
- You should feel the work in your buttocks area. If you don't, widen your knees. Don't focus on contracting your glutes; focus on pressing through the entire inner edges of your feet. Keep your upper body relaxed and look straight ahead.
- Repeat for 3 sets of 20 reps or until you feel this evenly on both sides of your glutes.
What this does for your appearance: Fights the no-butt look.
SUPINE FOOT CIRCLES AND POINT FLEXES
- Lie on your back with one leg extended and the other leg bent and pulled up toward your chest. Clasp your hands behind the bent knee. Keep the foot on the floor pointed straight up toward the ceiling and your thigh muscles relaxed.
- Circle the foot of the leg you're holding in one direction 20 times and then reverse direction for 20 more reps. Make sure the knee stays absolutely still with all movement coming from the ankle and not the knee. Make the biggest, fullest circles you can possibly make, as if you're scraping out the inside of an ice cream bowl with your foot.
- For the point/flexes, bring the toes of the elevated leg back toward the shin to flex, then reverse the direction to point the foot forward for 20 reps.
- Switch legs and repeat.
- Once you get good at doing 20 in each direction, increase the reps to 40, but don't compromise form and be sure to make each rep count.
What this does for your appearance: Combats the shrimpy-legs look.
Now Re-Assess Your Posture
A Case Study
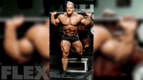
A woman came to me complaining of low back and sacroiliac (SI) joint pain that was limiting her from making any progress with squats. Her personal record for the front squat at the time was 165 pounds and she wasn't able to any heavier due to pain.

As you can see from her before photos, her right hip was significantly higher than her left, and her entire body leaned to the left. After one month of performing the daily series of exercises designed to correct these misalignments, her posture improved significantly, as did her pain levels and front squat. Soon, we completely eliminated her low back and SI joint pain and she was able to progress up to 190 pounds on her front squat.
Trish went on to compete in her first figure competition, and she continued to use her posture exercise regimen as the basis for maintaining muscle balance during her training.

This is proof that when proper load-bearing joint alignment is compromised, the muscular skeletal system simply isn't functioning at its greatest ability. Trying to build symmetrical muscle from left to right and front to back simply isn't possible on an asymmetrically aligned physique. They key takeaway? Straighten before you strengthen.